|
Cleaning procedure
 After having read all Tuner 600 safety instructions start the cleaning procedure by powering off any equipment into which the attenuator is built. Disconnect the equipment from the mains by pulling out the mains plugs. In the same way, power off any other connected equipment in the audio setup. After having read all Tuner 600 safety instructions start the cleaning procedure by powering off any equipment into which the attenuator is built. Disconnect the equipment from the mains by pulling out the mains plugs. In the same way, power off any other connected equipment in the audio setup.
Wait doing anything further until all reservoir capacitors in the equipment have discharged.
The cleaning procedure may now be carried out either while the attenuator remains connected and mounted in it’s usual location, or it may be disconnected and removed for cleaning. The cleaning procedure is easiest carried out if the attenuator is removed but the user may judge how difficult removing it is. Alternatively, if the attenuator remains in it’s usual location, it has to be considered if the applied Tuner 600 will make marks and traces on other parts of the equipment if applied too generously.
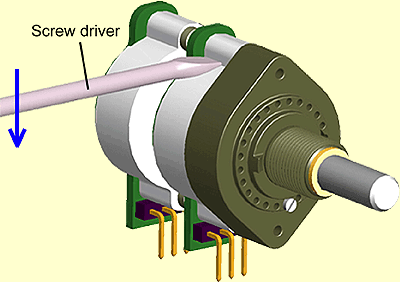
 Step 1. Now, open the cover of the attenuator deck in question for cleaning. This is the clear plastic cover (fig. 2) that protects the switching parts. The plastic cover consists of two identical halves clicked together in top and bottom. Un-click the two cover halves in their top joint carefully by using for instance a small screw driver. See fig. 3 Step 1. Now, open the cover of the attenuator deck in question for cleaning. This is the clear plastic cover (fig. 2) that protects the switching parts. The plastic cover consists of two identical halves clicked together in top and bottom. Un-click the two cover halves in their top joint carefully by using for instance a small screw driver. See fig. 3
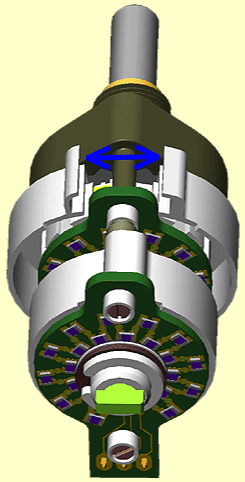
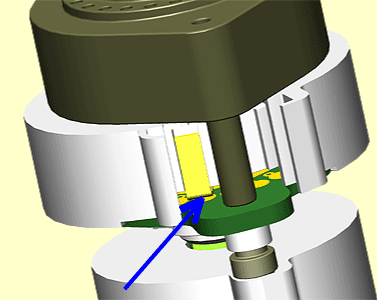
Step 2. Using the screw driver gently squeeze the two cover halves apart while “hinging” together in their lower click connection. See fig. 4. Only a small opening is required. Normally 5-10mm is sufficient (1/4-3/8”). Do not open the cover more than necessary for obtaining access to one of the gold plated contacts on the PCB (fig. 5).
Step 3. Tuner 600 is supplied with an extension tube that allows more precise injection of the chemicals. Attached this extension tube to the head of the Tuner 600 spray can.
Rotate the switch shaft so the sliding contact (see fig. 5) is located where the opening in the plastic covers has been made. Spray Tuner 600 onto the sliding contact and PCB contacts where the two touch (blue arrow fig. 5). Spraying for around one second is a suitable dose. Immediately after, operate in “wet condition” the switch by turning is fully clockwise and anti clockwise several times. Then leave the switch drying for 2-5 minutes until all Tuner 600 has evaporated, and repeat Step 3.
Step 4. Now leave the switch drying for 10 minutes or until all Tuner 600 is clearly evaporated. Using two fingers for gently clicking back together the two plastic cover halves.Make sure to actually feel the “click” ensuring the plastic covers are properly locked.
Step 5. In case the attenuator was unsoldered and removed from it’s usage location, connect it back into it’s circuit.
 Step 6. Be very careful when powering the equipment back up. Take every precaution to protect your speakers and amplifiers against any damage or wrong connection made during the cleaning procedure. Turn volume fully down before powering up.. Step 6. Be very careful when powering the equipment back up. Take every precaution to protect your speakers and amplifiers against any damage or wrong connection made during the cleaning procedure. Turn volume fully down before powering up..
|