|
CT-ext1. Shaft extension
kit.
 Purpose Purpose
Without the
CT-ext1 extension kit, the attenuator and the input selector
switch have to be mounted in the front panel of the equipment
enclosure. The purpose of the CT-ext1 shaft extension kit is
to allow mounting of the DACT CT1 or CT2 audio attenuators
and/or the CT3 audio input selector switch at any location
within the equipment enclosure. The recommended location of
both attenuator and input selector switch is as near to the
signal input/output sockets as possible. In this way, the
signal cables may be shortened and the sonic degradation
caused by the cables will be minimized.
At DACT we believe
in using non-magnetic materials for audio equipment and
CT-ext1 does not contain any magnetic parts. CT-ext1 consists
of:
- 1 pcs Extension Shaft. When ordering
please specify CT-ext1/S for a kit with a short version of the
shaft (200mm = 7.9 inch.) or CT-ext1/L for a
kit with a long shaft (400mm = 15.7 inch.). Shaft
material:
Aluminium.
- 1 pcs
Connection Link. Material: Brass. The connection link
includes 4 pcs M3 stainless steel screws.
|
Extension shaft
dimensions |
|
|
Short version
(CT-ext1/S) |
Long version
(CT-ext1/L) |
|
|
mm |
inch. |
mm |
inch. |
|
L1 |
200 |
7.9 |
400 |
15.7 |
|
L2 |
50 |
1.97 |
50 |
1.97 |
|
D1 |
6.5 |
0.256 |
6.5 |
0.256 |
|
D2 |
5.95 |
0.234 |
5.95 |
0.234 | |
-
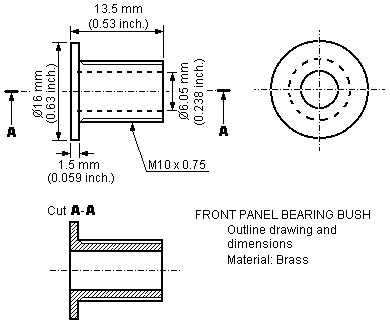
1 pcs Front Panel Bearing Bush. Material: Brass.
Includes
1 pcs M10 stainless steel nut

|

How to use
CT-ext1
1. Mounting the Front Panel
Bearing Bush. To mount the bush in the front panel
requires a hole in the front panel of at least 10mm
(0.395 inch.). Preferably, the hole should not be larger
than 13mm (0.512 inch.). Fasten the bush using the
supplied M10 stainless steel nut.
2. Mounting the
Connection Link.
Please observe that the mounting
holes in the two ends of the link are not of equal size.
The smaller hole (6.05mm = 0.238 inch.) is for fitting
the link to the shaft of CT1, CT2 or CT3. The other end
(hole diameter 6.6mm = 0.260 inch.) is for fitting the
aluminium extension shaft. Make sure to tighten all four
screws
properly.
|
|
 3. Fitting the
Extension Shaft. 3. Fitting the
Extension Shaft.
If the extension shaft is
longer than required, it may be cut to the right
length accordingly. PLEASE MAKE SURE always to cut
the end of the shaft with the largest diameter.
This end is to be fitted into the Connection Link,
whose hole diameter will accept the diameter of
the non-machined end of the shaft. Please observe
that the shaft is designed to be used with a knob
that has a 6.0mm hole (and not with a knob that
has a 1/4” hole).
| | |